The ongoing kennel project has come to the point where I thought you might enjoy a walk-through. It is no where near finished, but progress is being made. I am thrilled to be able to offer our residents secure, heated “bedrooms” to stay in on the cold winter nights that are coming.
Ready to go?
So, what do you think? Please leave a comment below.
Our Board of Directors approved the purchase of three Kennel Clad guillotine kennel doors. You’ll know why they’re called that when you see the video. I ordered them and they arrived quickly. I spent my afternoon today installing the first one. It went into Rebel’s bedroom.
I wanted Rebel to go out into his outer room so I could open his inner door and work less encumbered by having to open and close the door every time I went in or out. But Rebel was having none of that.
However, he perched himself on his bed and lounged there watching me work. He never got in my way and never tried to squeeze out the door with me. He watched intently as I worked as though it was the most fascinating thing he’d ever seen. He was SO adorable!
There were several challenges to overcome. The biggest was the fact that the walls I’m mounting the door slides on are not even close to be being flat. Warping the rails causes the door to bind. I got around that by shimming the rails where needed. Fortunately, as a former furniture maker, I have a fair stock of ultra thin pieces of wood laying around to stack up for the perfect shims.
It took me a couple of hours to unpack the boxes, decide what tools I needed, get everything staged, and then install the first door. But the end result is satisfactory. I should probably go buy some sheet metal to cut up for shims instead of using wood shims: wood will rot.
The final door has been installed and is working properly.
Check out my Walk Through video for the result.
Some time ago Debbie Ramey, who rescues dogs and horses was renovating her horse barn and had a bunch of 5 feet wide by 6 feet high American Kennel Club welded wire kennel panels in there that she wanted to be rid of. She asked me if I could make use of them here at Piney Mountain Foster Care. Oh, yes, I could! So she donated them to us and my friend, Trucker Tim, and I went down there with his truck and trailer, loaded all those panels on his trailer, and hauled them back here.
K4 For short term and emergency housing
Tim lives near by. Tim also has a barn. A barn with lots of extra space inside. He offered to let me store this trove of panels in his barn where they would be out of the weather until I found ways to use them all. I used 6 of them (one with a door in it) to build kennel 4. The rest went into Tim’s barn.
With the north wall of Kennel 2 Inside complete I just need a front panel for it to make it usable. The 10 foot long kennel panels I have on hand are too long for this application. One of those worked okay on Kennel 1 while I built a proper front panel with door, but in this position it just won’t work. I am rapidly filling up the empty space that was created by selling the stack of white oak lumber. So I went down to Tim’s place and retrieved a few of those 5 foot panels. I mounted 3 conduit hangers, which I use to attach the tubing frames to the concrete walls with concrete screws, in the opening. Then I used those as a hinge for the 5 foot panel. I hold the other end tight to the wall on the other side of the opening with rubber straps to keep the dog inside. This is just until I get a proper front panel with door built.
Then I got Josie’s Karunda dog bed and water bowl out of her outside kennel (K1) and moved it into the new inside space (K2) — leaving the barrier I have over the small door between inside and outside areas because Blade is still in K2 Outside. I took out the small igloo style dog house that was in K1 Outside for Josie and assembled a large one in there for Blade.
Josie had been running in the play yard while I did all this. Now it was time to get her back into K1 outside and let Blade out for his turn. While he played with Blondie Bear I removed his Karunda and water bowl out onto the sidewalk outside the kennels, closed the outside door to K2 and removed the barrier between K2 Outside and K2 Inside. Then I removed the barrier to K1 Outside and moved Josie into K2 Inside through the kennel building and secured the makeshift door/front panel. I put the K1 barrier back into place and went outside.
I moved Blade’s bed and water bowl into K1 Outside and called Blade to come get his treat and go into his room.
He came running, stopped short and gave me the side-eye, “That’s not MY room. What are you trying to pull?”
The short version is that he became Blade the Belligerent and I had quite a time getting him into his new room. But that’s another story.
Josie, on the other hand, was delighted with her new expanded living space.
Now when I give her a treat, instead of munching it down where she stands, like she always did before, she takes it to her inner sanctum, gets up on her bed and noshes on it there. Also, she has been kind of bad about barking at anything that’s moving about in the woods above the kennels at night. Last night she curled up in her “bedroom” and slept all night. We didn’t hear a peep out of her.
I swapped Blade and Josie’s rooms because Kennel 1 does not have an inside room ready yet. Blade has a plush coat of long fur to keep him warm. Josie doesn’t. Josie is still underweight too. She needs this shelter for the cold snap we’ve got coming this week (Low of 20 predicted Tuesday night). It’s just a couple of nights, then it warms up again. By the time it turns cold again I should have Blade’s (new) room done as well. Then everyone can get inside and away from the cold.
I need to sell another lumber pile. That will free up some more space and give me funds to start buying insulation to go in the roof and buy paint for the walls. Getting rid of the bare concrete block will go a long ways toward brightening the place up.
And doors. I need to install guillotine doors that can be opened remotely via a cable and pulleys. These will keep the cold and wind out at night and keep the dog inside or outside when I need to do that.
I got the wall for Kennel 2 (Blades room) done this morning. It’s not as pristine as my first wall, but the issues are probably not anything visitors will notice. I notice because I’m a self-flagellating perfectionist. But I know that, so I’ll move on anyway. But first I need a rest, some Ibuprophen, and a meal to rebuild my energy reserves.
Work table, tools and supplies moved to K1
After lunch I moved my work station and tools out of K2, swept the floor in there, and set up my work table and tools in K1.
I had to rearrange my stack of blocks because (dummy me) the next wall goes right through that stack. I remember thinking that I’d use enough blocks to shorten the stack enough to not impede the wall. But I didn’t bother to count them. I should have counted. Not even close.
K2 lacks only an interior door panel to be usable.
The pass-through door in K2 remains blocked with crate board and a couple of propane cylinders because I don’t want Blade roaming around in here- or slipping out and running off while I have the roll-up door open. Once I have a door across the front of that area, he will be allowed, if he chooses, to enter and utilize his inner sanctum. I doubt he’ll make much use of it. He prefers to be out on the front lines of the outer run to see as much as possible.
Once K2 was all squared away I laid in the first row of block for the kennel 1 north wall, making sure it is square and level. I’ll let that set up good and hard to form a solid foundation for building the rest of the wall.
I’ve almost got my “mud slinging” technique down. Almost. The trick seems to be in getting the consistency of the mortar just right: wet enough it will cling to the trowel a little, but not so wet it sloughs off of the block after I scrape it onto the edge. It needs to be the consistency of cake frosting. Very gritty, dark gray cake frosting. And there is a trick to moving the mortar from mortar bin to block without making it fall off on the floor or fly down the holes in the center of the blocks. This is my first attempt at block laying and I’m working with knowledge I learned from watching YouTube videos. I may be slow, but the end result seems to be good. I’m happy with that.
If I don’t get this last wall done before it turns cold I can move Blade into K1 (Josie’s room) and Josie into K2. I’ll go get a 5′ welded wire kennel panel out of Tim’s barn tomorrow (where I have stashed a bunch of them that were donated to us). I can use that as a temporary interior door to K2 until I get the chain link frame installed and sheathed with mesh. I’ll go into chain link mode once the blocks are laid and I can clear all those tools out of the way. It’s getting tight in here! Need to sell the rest of this lumber.
Blade doesn’t mind the cold. He seems to prefer it. With the full-body Parka he has for fur, I can understand why. Josie is not so well insulated. She needs the shelter.
I have found the vertically sliding doors I need to close off the small doorway between inside and outside runs. They’re expensive: right at $200.00 each for the Standard version, over $300 for the insulated doors (I’ll skip those). But they’re good quality: made by Kennel Clad for professional kennels and shelters and should last a long time.
There is another brand: Ecco(something) that makes doors for zoos, and are heavy duty enough to stand up to lions, and tigers, and bears (oh my!). They come fully assembled using roller bearing tracks. But they run in the $600 price range! Although Blade thinks he’s a lion, we don’t need anything THAT heavy-duty.
There are cheaper ones, too. Other brands can be had for as little as $60.00 per door. But these are light plastic panels in sheet metal rails and do not come with hardware and cables. My time working in a shelter proves to me that plastic doors get chewed up post haste and need to be replaced often. The Kennel Clad doors are plate aluminum with aluminum frames, stainless steel fasteners, that ride in extruded aluminum rails that are heavy duty to resist dogs trying to bash through the door. They will also stand up to frequent cleanings with disinfectants without rusting.
I need to get Board of Director approval to spend the money on them, but I want to get them ordered ASAP because heating a building with holes in the side is … problematic.
But for the moment, I’m building block walls. I’ll focus on that until our Board meeting.
Scout‘s inside room is now secure and accessible by humans (I mean aside from getting down and crawling through that hole in the wall – which I have done). The building is still pretty crowded with lumber and stuff, so getting a good camera angle is difficult.
I still need to find the channels that go on either side of the door hole so a sheet metal clad wooden panel can slide up and down in them to close off and open up the doorway. The channels are shaped like a lower case “h”, the panel rides in the three sided channel, the flange bolts to the wall. A cable (to prevent chewing it in half) goes up to a pulley on the wall, that splices to a rope that runs out front to a cleat. I pull the rope to open the door and tie it off to keep the door open.
I cleared out and swept the next section. I need to go get a load of block, then can get started enclosing Blade’s room: K2.
I finished the day by organizing my parts box. This will save time as I build the next panel: no more sifting through random parts looking for the one I need. I also put away all the wrenches, the pliers, wire cutters and such I used in building the chain link panel. Time to go back into masonry mode, those tools will just be in the way and maybe get lost in the shuffle. Tis better to straighten up before moving on.
It’s Saturday. Marie is home. She can help keep an eye on the inside dogs, so I can work outside more than I can during the week. I’ve accomplished several things, but the big task for today was to cart all the lumber on this lumber rack: (and if you can’t tell, that pile goes all the way up to the rafters),
Lumber rack on the wall to the left MUST go.
and move it to some place other than where it is: out of that building. That means putting it in some other building where it will still be in my way, but in a different place.
I accomplished that:
Once I remove a few screws the racks will come down and the whole wall will be clear.
I also went ahead and laid out my divider walls, which is not as simple as one would think.
Originally I planned to make three inside kennels; each 8 feet wide to match the three outside kennels. Simple. We even cut the doorways in, on that thought. But then I decided I didn’t need that much space in the inside kennels. Too much room encourages dogs to poop in a far corner and live with it. Less space means less temptation to do that.
I would like to have an inside space as an ICU room for recent surgery patients and dogs going through heart worm treatment. That means a smaller space: 4′ x 4′ is enough. I’ll take that dog outside on a leash.
That window you see messes up the idea of just dividing the remaining space into three equal rooms. And I need to keep the doors in mind, leaving room on either side of the doors to mount slide hardware for vertically sliding doors to shut the dog in or out (and keep the cold out at night).
With the wall clear I did some laying out on the wall with an orange lumber marking crayon. What works best is on the left, the 4 x 4 ICU, with the wall just to the left of the first doorway (currently being blocked with a piece of plywood to keep Siri where she belongs since the roll-up door is open). Kennel #1 and Kennel #2 are 5 feet long (by 4 feet deep) and kennel #3 is 6 feet 8 inches long. This one could be used as a double should I have two dogs who cohabitate well. Or one really big dog.
The walls between kennels will be 4″ wide concrete block, 6 feet high and I will cover the tops of the kennels with fencing like I did outside so dogs can’t climb out. But not until I get the insulation in and drywall ceiling up and painted. Each kennel will have a chain link front panel with a door (gate) in it so I can access the space from inside the kennel building. Once the building is emptied of lumber I can use that big empty space for training and storage.
I’ll remove the roll-up garage door and fill in the opening with a combination of block wall (where the ICU kennel is) and wood-frame wall (out in the main room where dogs won’t be likely to be digging at it or chewing on it). Know anyone who wants a garage door with electric opener? No remote, though.
I will seal the block walls and paint them some bright color. I would like to use epoxy garage floor sealer to ease keeping the floors clean. Since I don’t have a floor drain, interior clean-up will be done with a mop and bucket.
Last night I ordered all the chain link connectors, corners, clips, clamps, bolts, ties, and such from an on-line wholesaler I’ve used twice before and been happy with. Next week I will go to Home Depot to get the top rails, tension bars, fence fabric, and the 36 cement blocks I need for the first divider wall. None of that stuff can be economically shipped to me. I hope it all fits in my truck!
Then I will try my hand as a block-layer. A first for me, but … how hard can it be, right?
The Liberty Church Arts Fellowship (LCAF) is a fund that pays for a number if artistic entertainment venues each year. Among them is a professional grade short film. Last year I was privileged to work on the crew of that film (Special Election) and enjoyed the experience. Special Election won an Excellence Award at the Faith Based Film Festival in Atlanta Georgia last month.
The annual banquet and auction which is the main fundraiser for the LCAF is coming up and Marie came up with a clever idea for a donation box, themed to the short film project.
We presented it to church Pastor and film Producer today and we was quite taken with it.
Since I’ve started putting a dollop of home made bone broth on top of the dogs kibbles, excitement among our canine companions at feeding time has really ramped up!
This experiment is the first step in hands-on research for a new book on feeding dogs. It will cover the full spectrum from commercial kibble (what to look for and watch out for) to home-cooked dog food, to raw diets. Continue reading “New W.I.P.:Feeding Your Dog”
Once the new fence was in and the entire side yard was enclosed, we began entering and exiting our house via the “back” door (which is really more of a side door) and the back porch I just built. I have steps coming down toward the front to a boardwalk – which is a work in progress – but no steps off the back side. Yet. So I built a quickie “doggie plank” for the dogs (and me) to use in getting from the porch to the pathway I’m about to build.
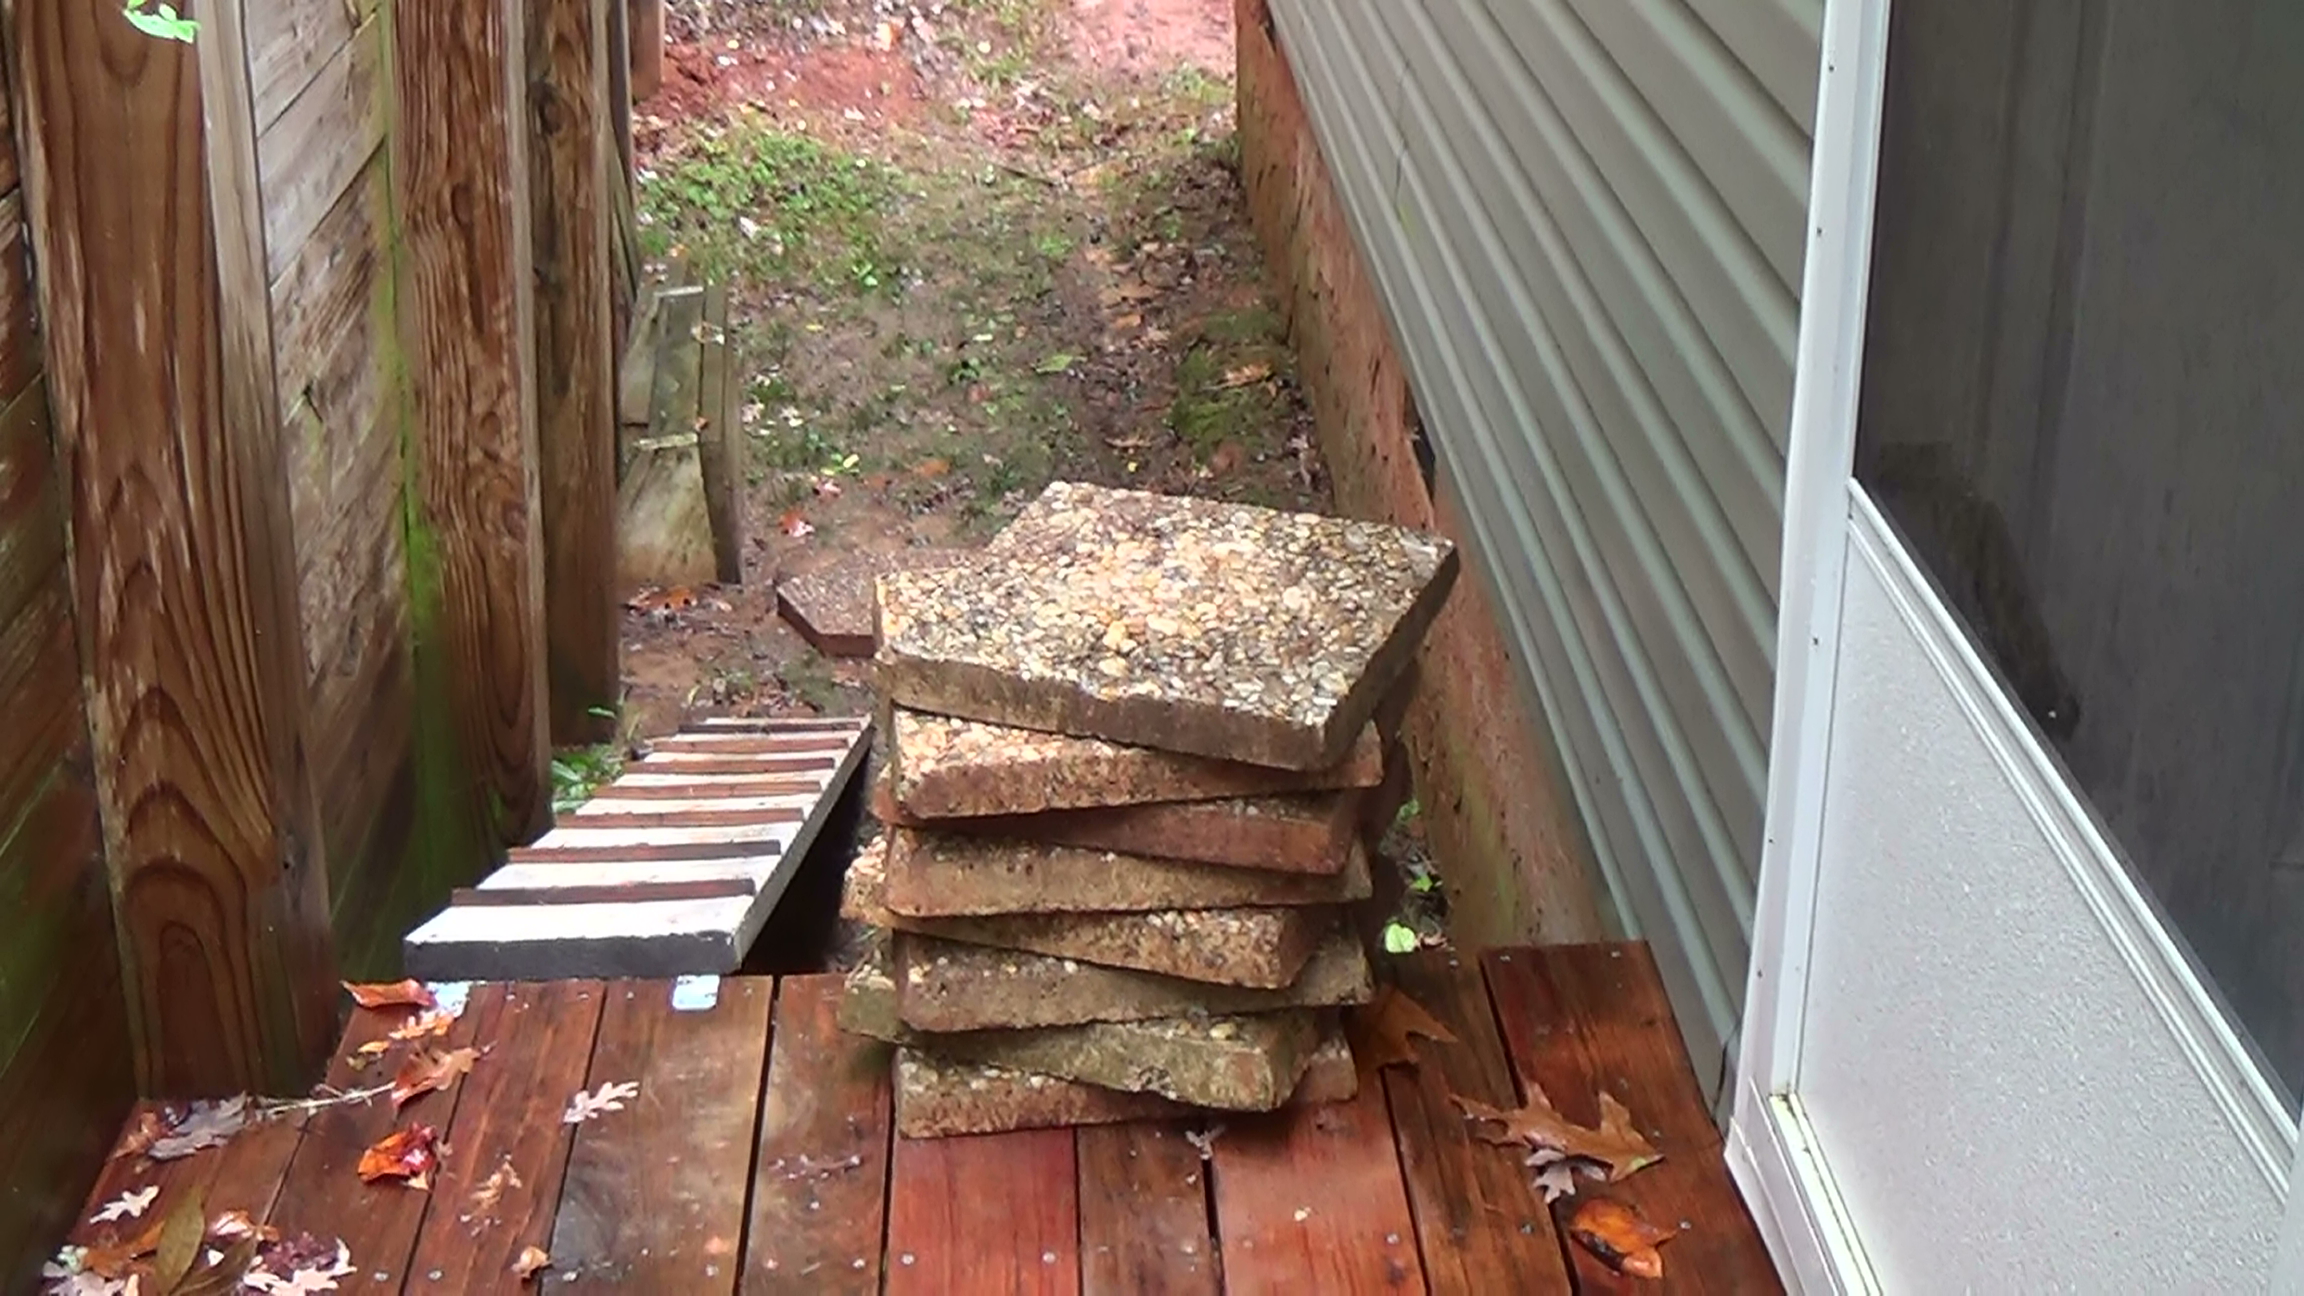
We travel through “The Chute” between the house and The Great Wall of Edwina and across the back of the house, which is at the base of a slope so it tends to stay wet a long time after a rain. To help keep the muck out of our house I began this upgrade by making a pathway of stepping stones.
I gathered these 16″ x 16″ x 2″ stones from various places around our property. Some were being used as weights atop the lumber piles, others were a pathway from the front porch around to the play yard side of the house. That path is no longer needed, so I could re-purpose those stones.
While I was carrying these stones from the play yard side of the house around the front to the back porch, Blondie and Cochise were lounging on the front porch, watching me work… Continue reading “Play Yard Upgrade 1: Gravel Pathway”
Marie and I have been providing canine foster care to dogs since June of 2012. We find it to be a very rewarding experience. Some posts to this blog promote animal fostering, offer training tips and cover canine health issues. I will post the stories about our foster dogs, articles about what we’ve learned as foster care providers, and some links to the organizations we work with.
But it doesn’t stop there. I’ve been busy setting up Facebook pages for each of the foster dogs where I can post short bits of information, pictures and videos about each dog. Why not just do all this on the web site? In a word: traffic. Continue reading “Piney Mountain Canine Foster Care”


 Since I’ve started putting a dollop of home made bone broth on top of the dogs kibbles, excitement among our canine companions at feeding time has really ramped up!