
We at Piney Mountain Foster Care are launching into a new project. That project begins with the departure of Lucy and Selma this Friday.
 Normally when a foster dog or two (or three) leave us, I have the weekend to power wash and sanitize the dog houses and kennels that are now empty. But this time I will be dismantling these kennels instead. But not because I’m quitting, not even cutting back. Instead we are upgrading these kennels.
Kennel #1 was the abode of Cochise, our very first foster dog, back in 2012. At first, that kennel was erected on the ground in an area that had been a driveway. The ground was hard-packed mudcrete – a mixture of dried mud and gravel. This was fine in dry weather, but got sloppy when he pranced around in there when it rained. To help keep him clean, we laid down a thick layer of straw. That failed! Upon the advice of other kennel owners I elevated the kennel on landscape timbers and filled them with a 3″ layer of pea gravel.
Pea gravel worked better, but eventually the gravel got driven down into the mud and mud squooshed up into the gravel and we were back to mudcrete. So I dug all that out, laid down a layer of Rok-Cloth — a heavy fibrous mat that keeps the pebbles above the mud. That worked well until the dogs started digging. Once the mat was torn up, the mud and gravel mixed and were are right back where I started. I need a more stable, dig-proof surface.
Why Concrete?
I need a way of getting the dogs above the water that flows through the area in a heavy rain. I need a surface that is stable (hard) enough to prevent digging. I need a surface that can be easily cleaned every day. Concrete seems the natural solution.
Kennel owners cautioned us against concrete as a floor because it is hard on the dog’s joints as they lay on it, causing thick pads to form at the elbows especially. And I can see how that would be true if we didn’t provide the dogs with elevated beds, blankets, and a dog house. Laying on these will take the wear and tear off their limbs.
Phase 1
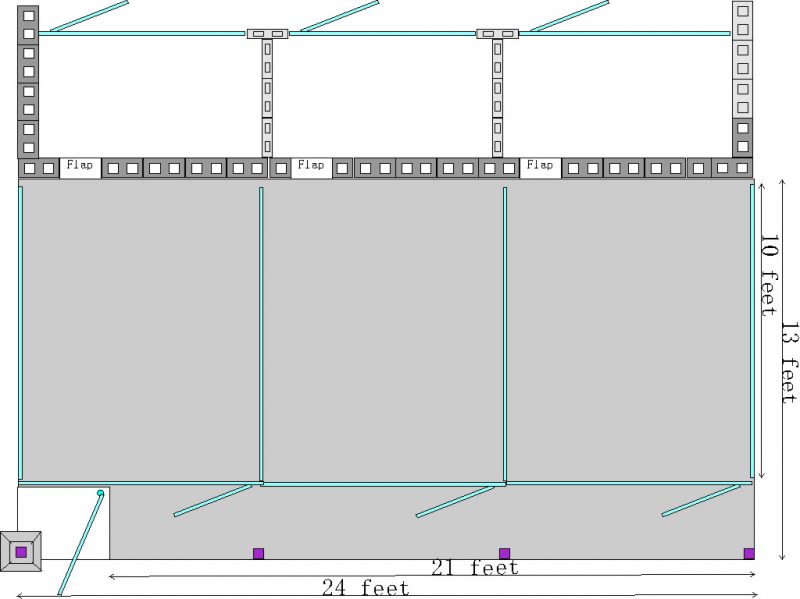
The first step of this upgrade will be to pour a 13 foot by 24 foot concrete slab next to our garage. Robert Gann has given us a good price on this. But before he can do that I have to get the three kennels we now have out of the way. Two are sitting right where the slab has to go. I’ll dismantle them completely. The third is in the way, but will be needed by Lennon, who will be staying with us for a while: two to three months probably. I’ll move that down into the yard.
Since the kennels form part of our perimeter fence, and because the work area has to be clear to allow a concrete truck to wiggle in there, I will use the panels of the dismantled kennels to build a temporary fence across the yard from the back fence to the mobile home that serves as doggie bunkhouse and my workshop.
Once the slab is poured and cured, I will erect three kennels, each 8 feet wide and 10 feet deep, atop it. That will close in the fencing again and the kennel complex will be in a neat, compact unit sitting next to our garage – which is currently a lumber shed.
 UPDATES ON PHASE 1:
Phase 1 is complete. The cost for Phase 1 was $1,500.00
Phase 2
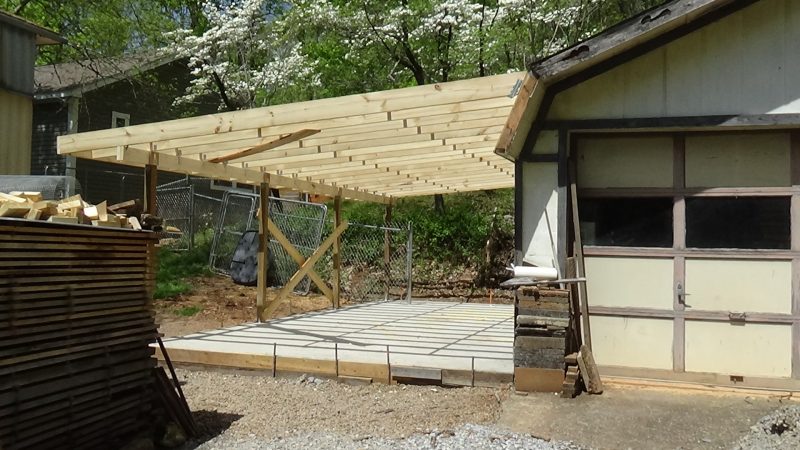
The second phase will be to build a solid roof over the new kennels. A roof with enough overhang to keep rain well away from the kennels in calm weather. This roof will be a lean-to attached to the current garage roof and supported by posts and a beam outside of the kennels and a sidewalk. Sort of like this:
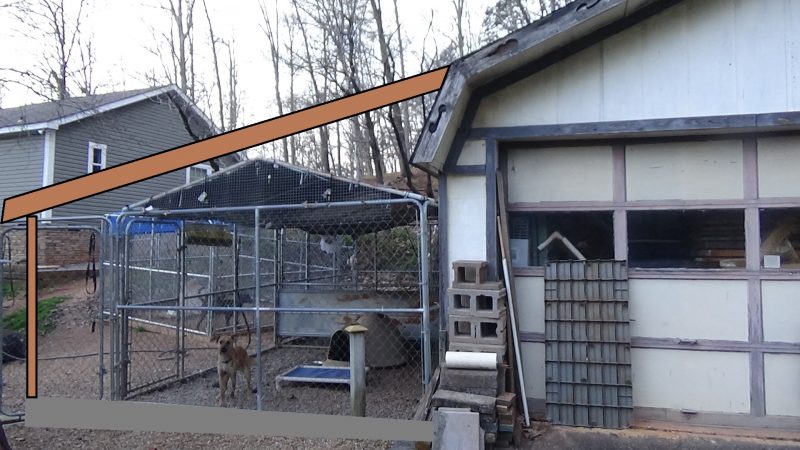 You can see that right now, the garage roof and the kennel roof actually funnel rain into a slot between the two. This is not a problem in a light rain: the slope and the deep gravel allow rain to flow through. But in a heavy rain (like we’ve been getting) the dogs are standing in water unless they are on their bed or in their dog house. This new roof will channel all the runoff out beyond the kennels, and a gutter and down spout could pipe it into the drainage system and eliminate splatter in all but the heaviest rain.
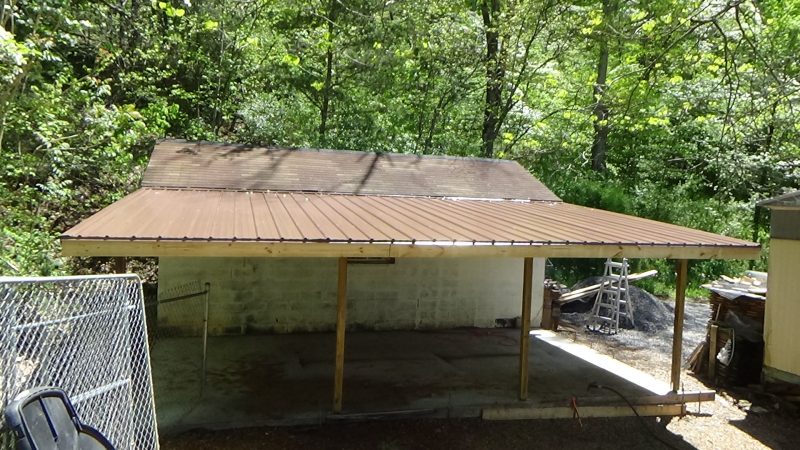

Cost for materials: $1822.00
Labor was all volunteer.
Phase 3
The final phase will be to empty the lumber from the shed/garage and clean it out so I can construct three 4 foot by 8 foot kennel spaces inside the garage (see Phase 1 drawing above). The walls between kennel units will be 4×16 inch cinder block to prevent “arguments” between dogs while inside. A chain link front panel with a door will be built for each.
Holes will be cut through the block wall between inside and outside kennels and rubber-flap doors installed to help block the wind. This will allow the dogs to move from inside to outside at will. By installing a sliding wooden door too, I can block a dog inside or outside when I need to. This set-up worked well at the shelter where I used to work.
I’ll insulate the garage roof and install an infrared heater and small ceiling fan above each kennel to provide heat and cooling as needed. The building already has a big squirrel-cage blower mounted in the loft to pull out heat in the summer. A window air conditioner could be installed if needed.
The big roll-up door will come out and the kennel end of the opening will be blocked in. The entry door will be moved to a more central position. The rest of the front wall will be framed and covered with siding. When complete, the front of the building will be painted to pretty it up.
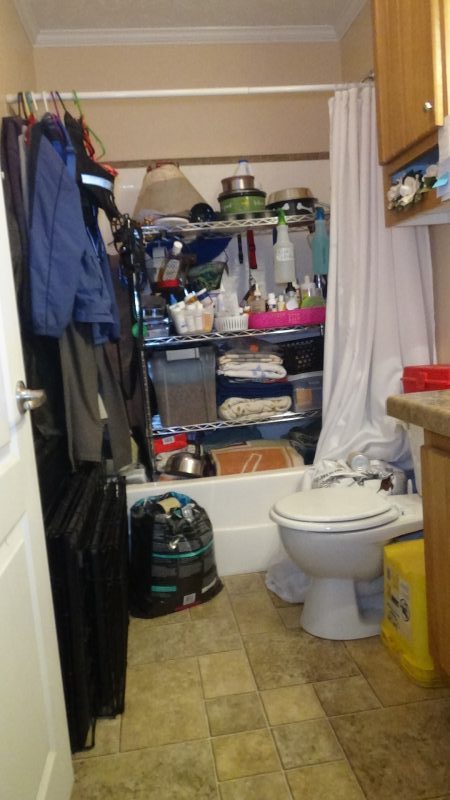
Shelving inside will allow me to move dog stuff out of our home and into the kennel. That will be convenient in many ways, including having use of our bath tub once again.
Do you want to help?
And that’s the plan. I am doing my best to keep the costs as low as possible by doing as much of the work myself as possible and enlisting volunteers.
We want to avoid going into debt to pay for this so we’re taking it on as we accumulate the cash to pay for it. If you’d like to help us speed that along, your donation would be greatly appreciated. You may make a donation on-line with the PayPal button below or you may mail a check to:
| Doug Bittinger 1198 Piney Mountain Road Newport, TN 37821 |
Marie has suggested that we have a plaque with the names of donors made up to go in the completed kennel building. I think that’s appropriate. If you want to donate but DON”T want your name on the plaque, say so in the notes area or enclose a note with your check and we will respect your privacy.
And thank you!
| If you enjoy our updates, Doggy Tales, and educational articles consider subscribing for notices when new pieces are posted. It’s painless and you can unsubscribe any time you want. Your e-mail address is used ONLY to deliver these notices. | [email-subscribers namefield=”YES” desc=”” group=”Public”] |


9 comments on “Big Doins On Piney Mountain”
Comments are closed.